Manage your account and subscription
As a root admin, you can manage your 10Duke Scale account and subscription, for example, to purchase extensions.
All admins can view the account and subscription information.
View and edit your account
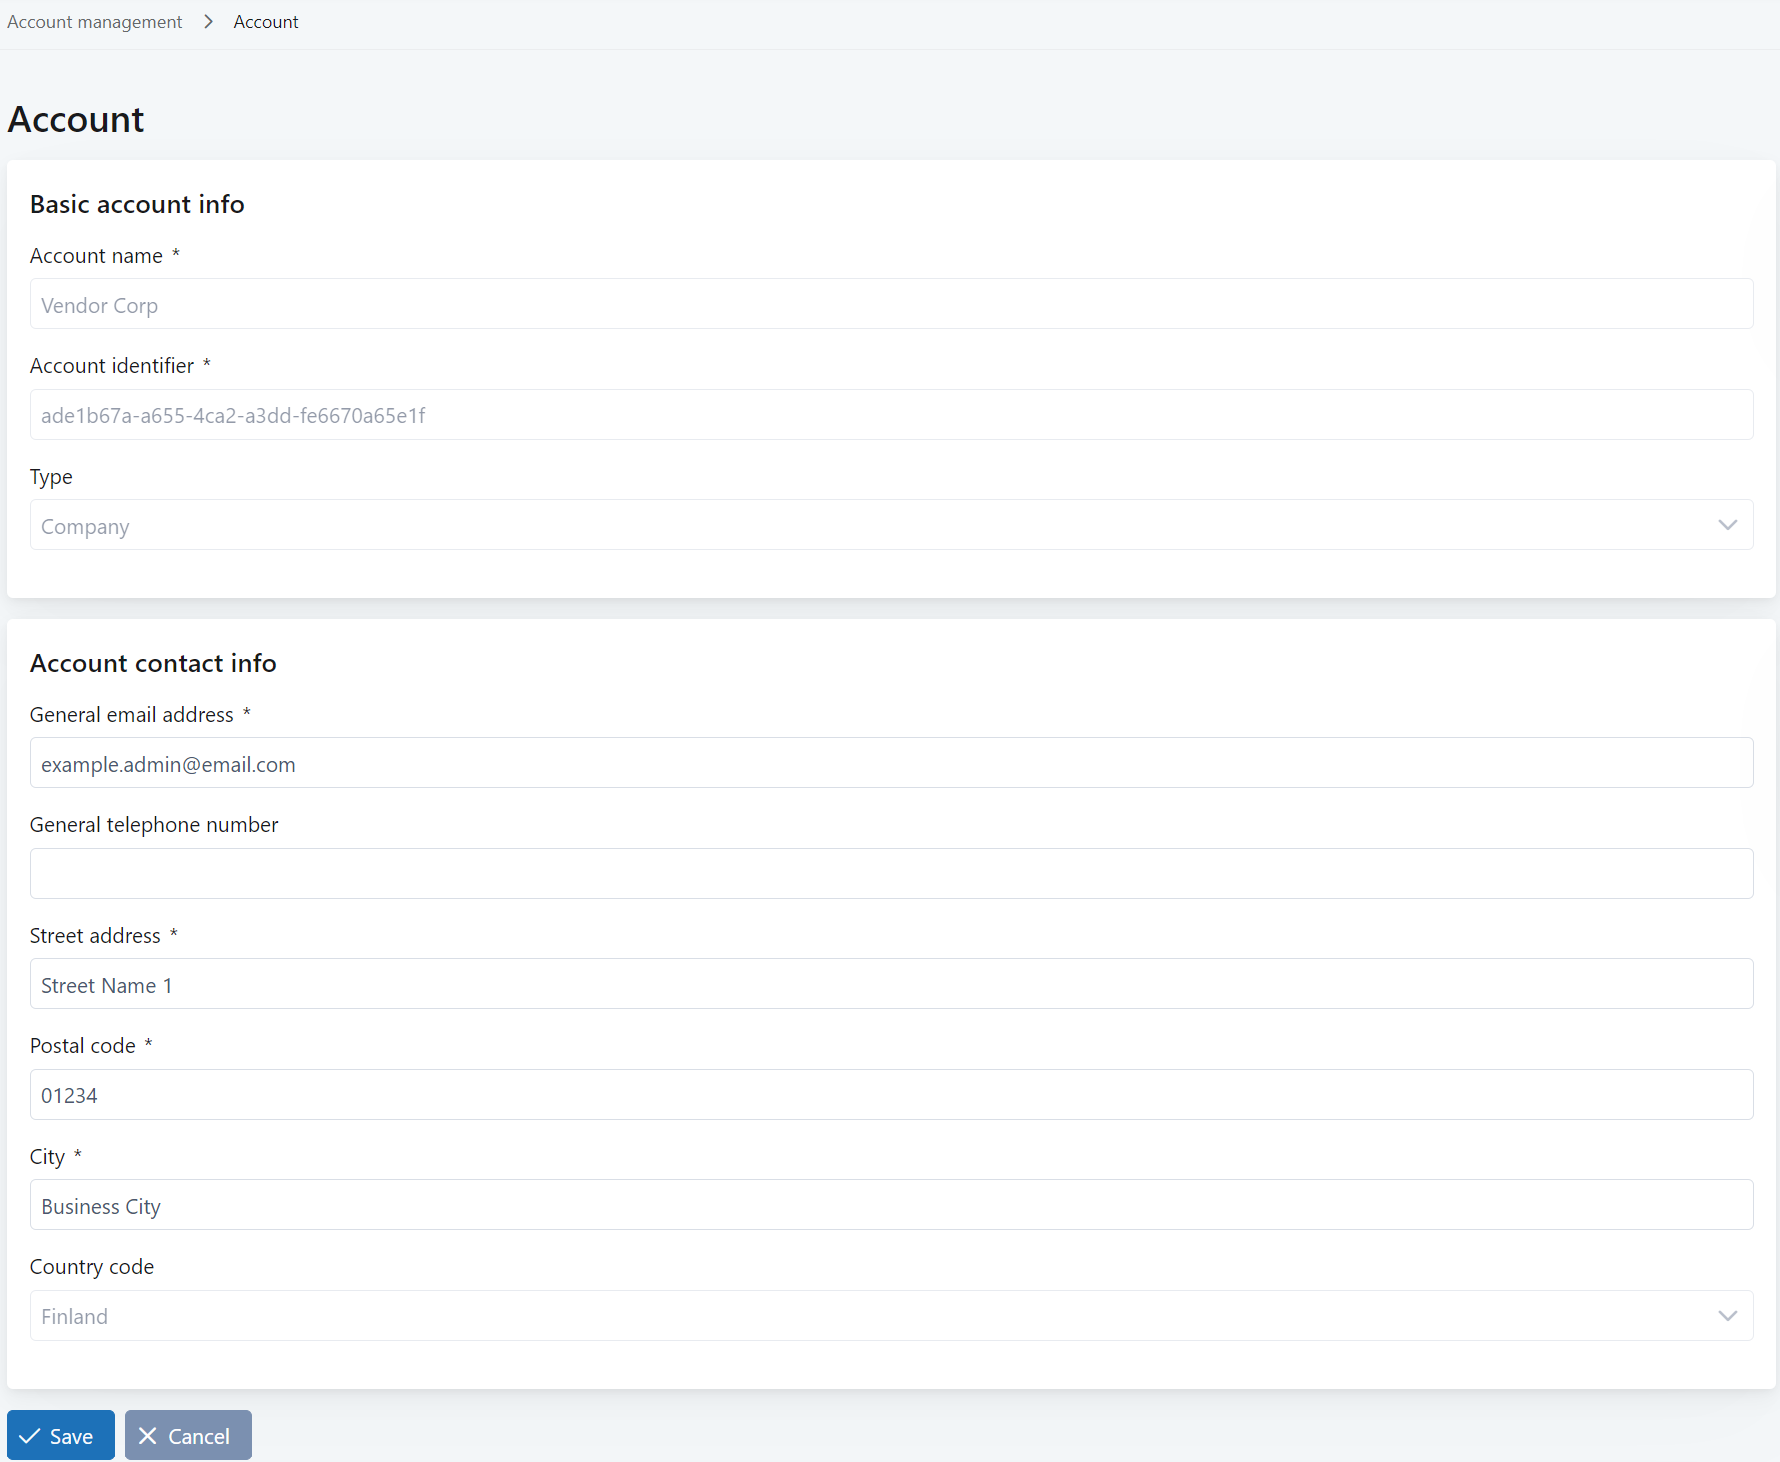
You can edit the contact information of your 10Duke Scale account:
-
Click the profile menu in the top right corner and select Account. The Account page opens.
-
Edit the contact information and click Save.
Below the account information, Root user shows the admin who has root privileges to the account, and Cloud services shows the cloud service region and instance where your account is hosted and your API base URL.
View your subscription
You can view the details of your 10Duke Scale subscription.
You can check your current quota usage on the Dashboard.
To view your subscription:
-
Click the profile menu in the top right corner and select Account.
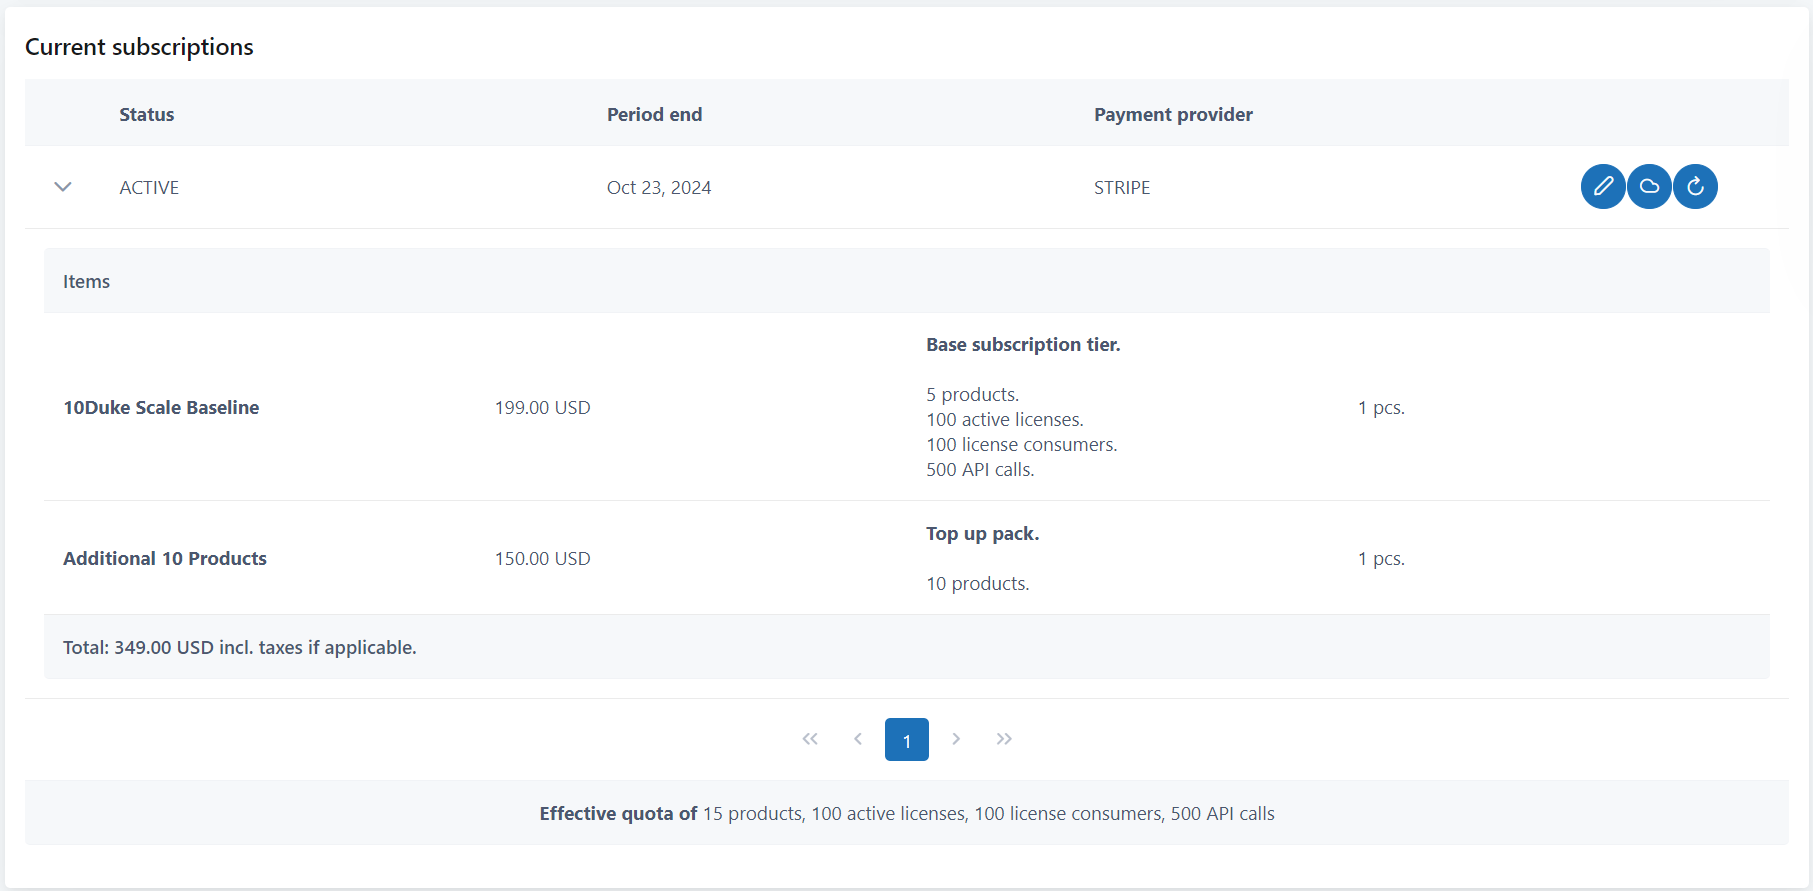
On the Account page that opens, Current subscriptions shows your subscription details.
-
Click the pen icon for the subscription.
A page opens showing you the packages that you have already purchased in Current subscription content.

The list shows the purchased quantity, monthly unit cost, and monthly total cost for each package.
View details of your metered subscription
You can view the details of your 10Duke Scale metered subscription.
To view details of your metered subscription:
-
Click the profile menu in the top right corner and select Account.
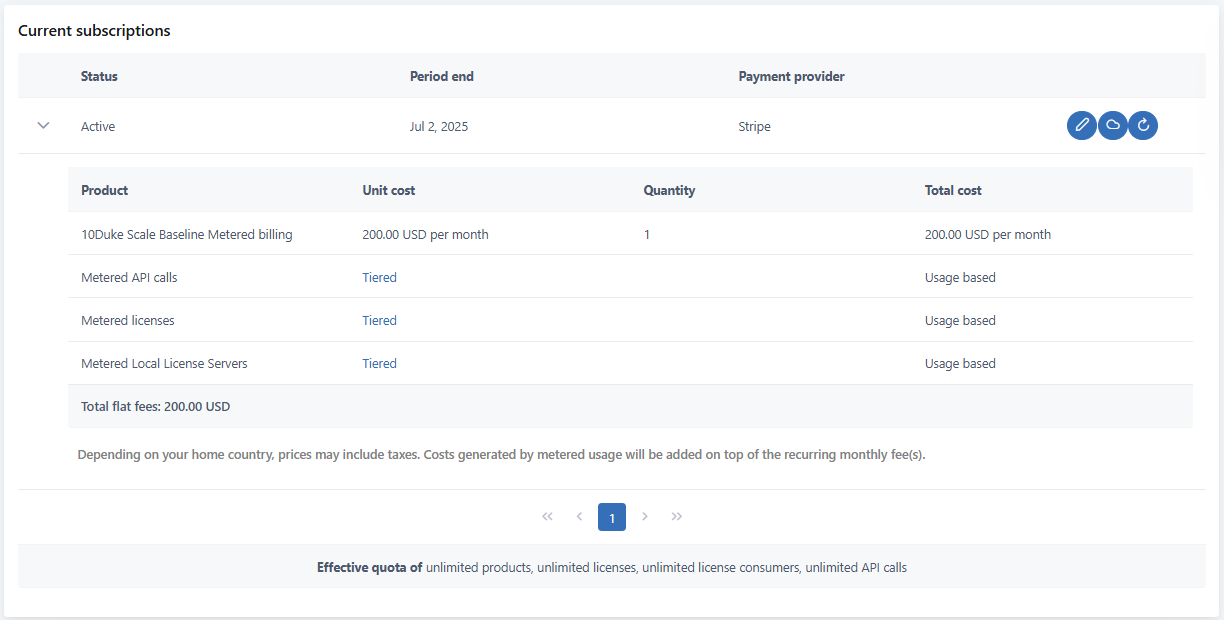
On the Account page that opens, Current subscriptions shows your subscription details.
-
Click the Tiered link in the Unit cost column for a product within your metered subscription.
A page opens showing you the details of your purchased subscription items with tiered pricing. If you have purchased subscription items with fixed pricing, those are shown as well.
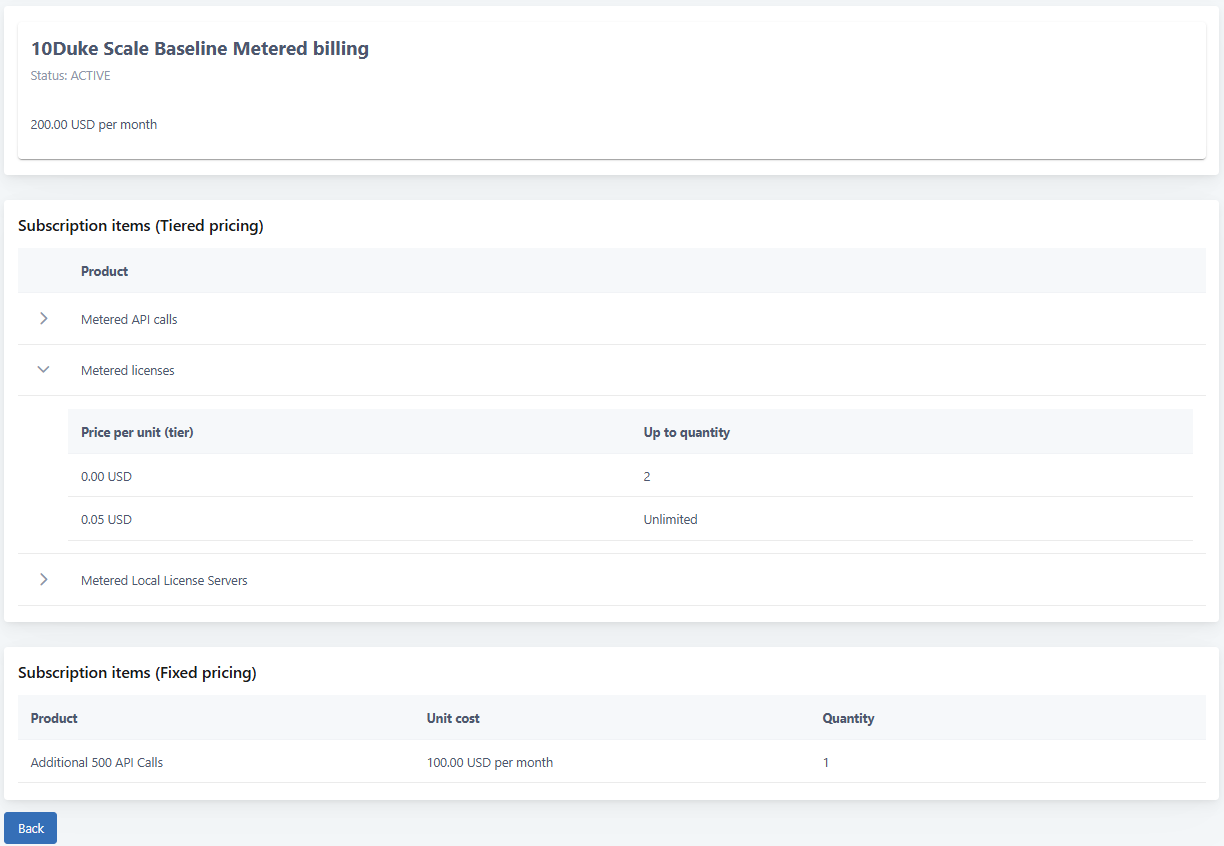
For each product with tiered pricing, the list shows the price per unit (tier) and quantity limit applicable to that tier. For each product with fixed pricing (if available), the list shows the purchased quantity and monthly unit cost.
View usage overview
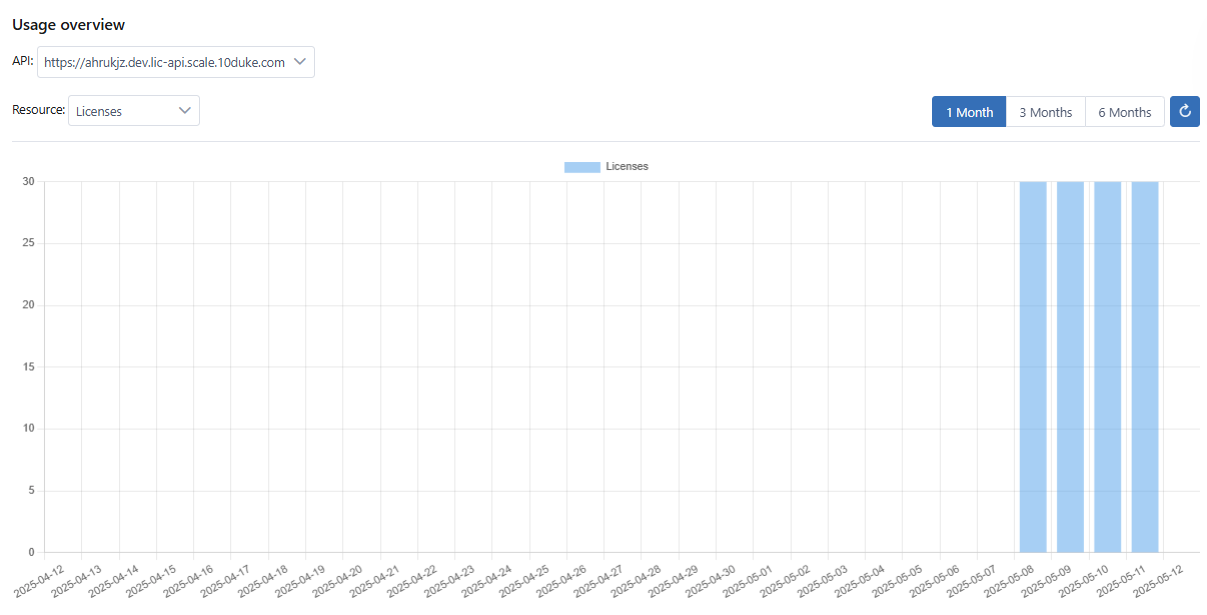
You can view an overview of your resource usage, for example the number of licenses or API calls, in 10Duke Scale for the selected API, within the selected time period.
The overview shows the usage of the selected resource for each day during the selected time period. If the selected resource does not have any usage on a specific day, an empty count is shown in the overview.
To view your usage overview:
-
Click the profile menu in the top right corner and select Resource usage.
The page shows the usage of licenses for the past month. If needed, you can edit the resource and time period shown in the chart.
-
In API, select the API for which you wish to view the usage overview.
-
In Resource, select the resource for which you wish to view the usage overview. You can view the number of API calls, licenses, or Local License Servers. By default, the number of licenses is selected.
-
Select the time period for the usage overview. The available options are 1 month, 3 months, or 6 months. By default, the 1-month period is used in the usage overview.
-
Click the reload icon.
The chart shows the usage overview for the selected API and resource, over the selected time period.
Purchase extensions
If needed, you can purchase extensions for customers, licenses, and API calls.
When you purchase a package, the displayed monthly cost will be added to your current subscription fee.
Note: When making changes to your subscription, you are charged for the duration that the selected items are included in your subscription. Thus, your total fee may differ from the fee shown in the shopping cart.
Also, when you change your metered subscription, the changes become effective at the start of that day, even if the change was made later that day. All usage for the entire day will be billed according to the new subscription.
-
Click the profile menu in the top right corner and select Account.
On the Account page that opens, Current subscriptions shows your subscription details.
-
Click the pen icon for the subscription.
A page opens showing you the packages that you have already purchased in Current subscription content, and packages available for purchase in Extensions available for purchase.

-
Click the shopping cart icon next to a product package in Extensions available for purchase.
The selected product package appears in the Selected for purchase section in the Shopping cart side panel.
You can close the shopping cart by clicking the X icon in the top right corner of the side panel or the Hide button. Alternatively, you can click anywhere outside of the side panel. To access the shopping cart again, click the shopping cart icon in the top right corner.
You can remove a product package from the shopping cart by clicking the trash can icon next to it. If you have purchased a certain package multiple times, they’re removed one at a time. You can remove all product packages from the shopping cart by clicking the Clear cart button.
-
To complete the purchase, click Apply changes, and confirm your purchase by clicking Yes.
A page opens showing your updated subscription details. The purchased extension(s) are shown in your subscription and you can start using them immediately.
Change your baseline subscription type
If you need to switch between baseline subscription types, you can purchase a new baseline package.
Note: Purchasing a baseline package removes the previously purchased extension packages from your subscription, and changes your current baseline subscription to match the baseline package selected for purchase. This can lead to significant changes in the billing model, and therefore, to the available quota and features.
When you change a metered billing baseline package, the current billing cycle is reset and an invoice will be sent immediately. The invoice includes all usage up to the date of the baseline change, along with any prorated fixed-price items. The next invoice will then be sent one month from the baseline change date.
-
Click the profile menu in the top right corner and select Account.
On the Account page that opens, Current subscriptions shows your subscription details.
-
Click the pen icon for the subscription.
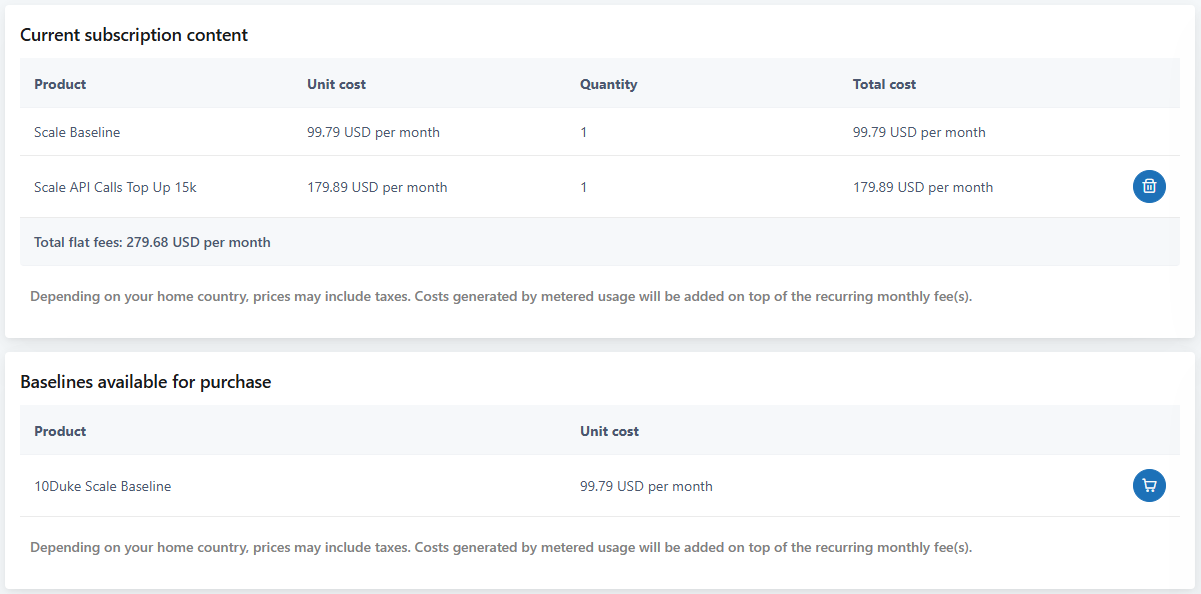
A page opens showing you the baseline package that you have already purchased in Current subscription content, and baseline packages available for purchase in Baselines available for purchase.
-
Click the shopping cart icon next to a baseline package in Baselines available for purchase.
-
Click Yes to confirm the purchase of the baseline package.
The selected baseline package appears in the Selected for purchase section in the Shopping cart side panel.
When you select the baseline package for purchase the shopping cart is emptied, and you cannot purchase other packages with the baseline package.
You can remove the baseline package from the shopping cart by clicking the trash can icon next to it, or by clicking Clear cart.
-
To complete the purchase, click Apply changes, and confirm your purchase by clicking Yes.
A page opens showing your updated subscription details. The baseline package is changed in your subscription and you can start using it immediately.
Remove a package from your subscription
You can remove a package from your subscription if you no longer need it.
You cannot delete the baseline package from your subscription, but you can change your baseline package to another one.
-
Click the profile menu in the top right corner and select Account.
On the Account page that opens, Current subscriptions shows your subscription details.
-
Click the pen icon for the subscription.
A page opens showing you the packages that you have already purchased in Current subscription content.
-
Click the trash can icon next to a product package in Current subscription content. If you have purchased a certain package multiple times, clicking the trash can icon removes them one at a time.
The product package to be removed appears in the Selected for removal section in the Shopping cart side panel.

You can remove the product package selected for removal by clicking the trash can icon next to it in Selected for removal in the shopping cart. If you are removing multiple quantities of the same package, they’re removed one at a time.
-
To complete the removal, click Apply changes, and confirm the removal by clicking Yes.
A page opens showing your updated subscription details. The changes take effect immediately.
View usage of subscription quota
In the left sidebar, go to SETTINGS > Dashboard to view how your account’s current subscription quota is being used.
The Subscription quota usage status section shows, for example, how many licenses you have issued out of your allowed quota, and how much you have used of your monthly quota of API calls.
View subscription invoices
Your 10Duke Scale subscription is automatically invoiced monthly from your selected payment method.
You can access your billing information from the UI console at any time, and download your invoices and receipts if needed.
To view your 10Duke Scale invoices:
-
Click the profile menu in the top right corner and select Account.
-
In Current subscriptions, click the cloud icon for the subscription.

This opens the subscription’s billing and payment method information in the external payment provider. INVOICE HISTORY at the bottom of the page lists your invoices by date.
-
Click an invoice to view it.
A dialog opens where you can view more details, and open the invoice and receipt as PDFs for downloading.
Cancel your subscription
You can cancel your subscription, and reactivate it later if needed. The cancellation will take effect after the current subscription period has ended.
To cancel your subscription:
-
Click the profile menu in the top right corner and select Account.
-
In Current subscriptions, click the cloud icon for the subscription.

-
On the subscription page that opens in the external payment provider, click Cancel subscription, and confirm by clicking Cancel subscription again.
-
When you return to the UI console, Current subscriptions shows the subscription status as canceled and the end date of the current subscription period, after which the subscription will end.

When your subscription has ended, the subscription quota is set to zero, and you cannot, for example, create new data in the system.
If you want to reactivate your subscription, go back to the same subscription page (see above), click Renew subscription, and confirm by clicking Renew subscription again.
Pause your subscription
You can pause your subscription, and restart it later if needed.
Pausing your subscription follows the same steps as when canceling your subscription.
When your subscription is paused, you cannot, for example, make any API calls. However, your 10Duke Scale account and product configurations will remain intact.
If you want to restart your subscription, go back to the subscription page (see canceling your subscription), click Renew subscription, and confirm by clicking Renew subscription again.
Terminate your account
If needed, you can request the termination of your account in 10Duke Scale. Account termination cannot be requested during the trial period.
The termination is done by 10Duke within 14 days.
Caution: If you choose to terminate your account, this will delete all data relating to your account, such as your products, customers and their licenses, and license consumers. This will also terminate your admin access to the UI console. You can use the 10Duke Scale License Management API to retrieve all your data before the account termination.
Only minimal account contact information is preserved in case we need to contact you. If you wish to have that deleted as well, contact 10Duke.
Before you start:
- Cancel your subscription first: you cannot request termination if your account has an active subscription.
To request account termination:
-
Click the profile menu in the top right corner and select Account.
-
In Delete account, click Request account delete, and confirm by clicking Yes.
You can still cancel the request until your account has been terminated. Click Cancel request for account delete, and confirm by clicking Yes.
The account termination cannot be reversed, but you can create a new account if needed.